

Getting Started with ESPHome
This guide walks you through turning a microcontroller into a smart home device: creating a configuration, adding hardware to it, installing it onto the device, and connecting the result to Home Assistant.
It assumes you already have ESPHome installed. If you don’t, start at Install ESPHome and come back here.
Introduction to ESPHome
Section titled “Introduction to ESPHome”ESPHome turns common microcontrollers into smart home devices without writing any C++.
You describe what your device should do in a “configuration”: one or more YAML files listing the hardware attached to it. ESPHome reads that description and builds custom firmware for your device. Anything you define - sensors, switches, lights, displays - appears automatically in Home Assistant’s user interface.
The ESPHome Device Builder is the web interface where you create, edit, and install those configurations. The steps below are written for the Device Builder because that’s what most installs give you. If you installed the command-line tool instead, see Using the Command Line Instead for the equivalent commands - the YAML is identical either way.
Connecting Your Device
Section titled “Connecting Your Device”The very first install has to happen over a USB cable; every update after that can happen wirelessly. Follow Physical Device Connection to get your device plugged in and recognised by your computer.
NOTE
This initial installation is usually the most fiddly part of the whole process, at least until you’ve done it a few times. If something doesn’t work, the Troubleshooting guide covers the common causes.
Creating Your First Configuration
Section titled “Creating Your First Configuration”Open the Device Builder. With no devices yet, it invites you to create one - click Create device to start the wizard.
The wizard asks how you’d like to create your configuration. You have three options:
- New Device Setup: The wizard guides you through platform selection, board configuration, and Wi-Fi setup to create a basic working configuration. Choose this if you’re not sure.
- Import from File: Upload an existing ESPHome configuration file (
.yamlor.yml). This is useful for restoring backups and migrating configurations. You can browse for files or drag and drop them onto the dialog. - Empty Configuration: Creates a minimal configuration file, for people who prefer to write their own from scratch or paste one from devices.esphome.io.
At the end of the wizard you have a configuration file. It doesn’t do much yet - it connects your device to Wi-Fi and not a lot else - but it’s enough to install.
If you didn’t enter your Wi-Fi credentials during the wizard, do it now: without them the device can’t reach your network, and therefore can’t talk to Home Assistant or accept wireless updates.
The Device Builder Interface
Section titled “The Device Builder Interface”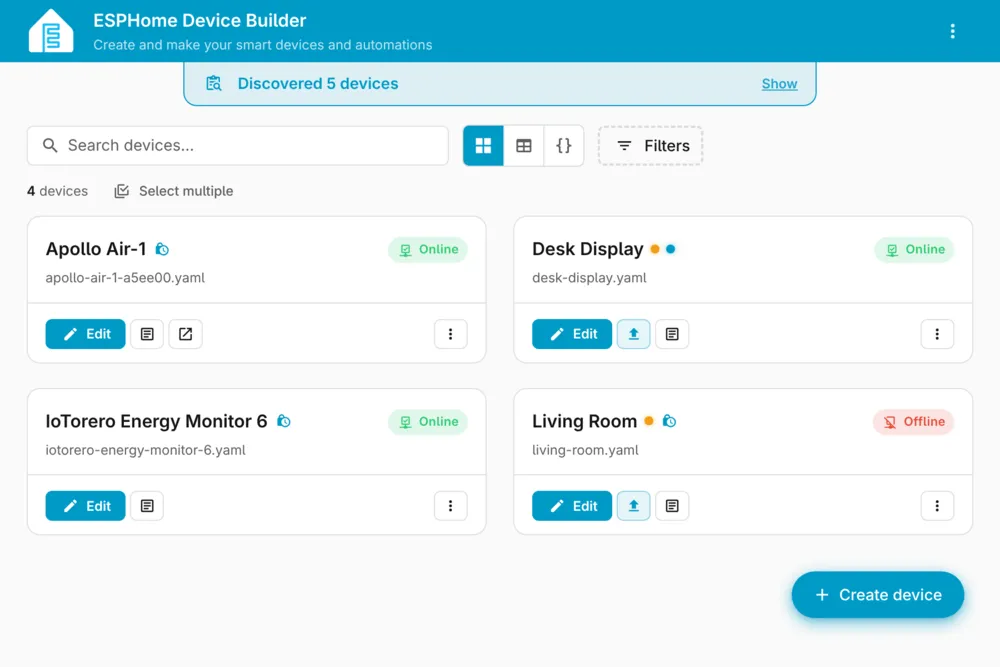
The main page lists every device you’ve created, as cards by default. The controls above the list let you search, switch between card, table, and YAML views, and filter by platform, area, or label. Select multiple turns on bulk actions, and ESPHome devices already on your network that the Device Builder doesn’t manage yet appear under Discovered.
Each device card shows its configuration file name, an Online or Offline badge, and these actions:
- Edit: Opens the configuration editor.
- Install (upload icon): Compiles the configuration and installs it onto the device.
- Logs (document icon): Shows the logs coming from the device. If it’s connected via USB you can use the serial connection; otherwise the Device Builder connects over the network.
- Overflow menu (⋮): Additional actions, including Validate to check the configuration without building anything, and Clean build files to delete generated build output. Cleaning often resolves compile errors, is safe to do at any time, and is worth trying before reporting a bug.
Configurations are stored in the esphome/ directory of wherever you pointed the Device Builder. Under Home Assistant
that’s <HOME_ASSISTANT_CONFIG>/esphome/, so the “Living Room” device above lives in
/config/esphome/living-room.yaml.
NOTE
Home Assistant apps run as individual containers, which makes reaching those files from a shell a little awkward. If
you need to, install Home Assistant’s
SSH app, configure it with a
username and password, and disable “Protection Mode” (assess the risks of doing so first). You can then run commands
against the app’s container, for example
docker exec -it addon_5c53de3b_esphome esphome logs /config/esphome/living-room.yaml.
Adding A Switch
Section titled “Adding A Switch”Click Edit on your device to open its configuration, and add a GPIO switch:
switch: - platform: gpio name: "Living Room Dehumidifier" pin: GPIOXXReplace GPIOXX with the pin your hardware is actually wired to. The switch could control anything - a dehumidifier, a
lamp, a fan - the name is yours to choose and only affects how it’s labelled in Home Assistant.
The configuration format should look familiar if you’ve used Home Assistant’s configuration.yaml; ESPHome deliberately
stays close to it. ESPHome also translates board-specific pin names for you, so on a NodeMCU board you could write D1
instead of the raw GPIO number.
In Home Assistant, the example above ends up looking like this:

Adding A Binary Sensor
Section titled “Adding A Binary Sensor”Next, add a binary sensor, which reports whether a GPIO pin is pulled high or low:
binary_sensor: - platform: gpio name: "Living Room Window" pin: number: GPIOXX inverted: true mode: input: true pullup: trueNote that pin: here is a block rather than a single value. Almost every pin in ESPHome accepts this longer form, which
adds options for inversion and pin mode - see the Pin Schema for the full
set.
Click Save when you’re done, then read on.
Updating Your Device
Section titled “Updating Your Device”Saving a configuration does not change the physical device. Every time you edit a configuration you need to click Install to recompile the firmware and push it to the device.
After the first install you won’t need the USB cable again - ESPHome updates devices over the air.
Connecting Your Device to Home Assistant
Section titled “Connecting Your Device to Home Assistant”Once your configuration is installed and the device has joined your Wi-Fi network, Home Assistant discovers it automatically (assuming your network allows mDNS) and offers to set it up:

You can also add it by hand from the Home Assistant Integrations page: click Add Integration, search for
“ESPHome”, and enter the device’s host name. The host name comes from the name you gave the device, so a device named
living-room-lamp is reachable at living-room-lamp.local. Its IP address works too, if you’d rather use that.
Repeat this for each ESPHome device you create.
Using the Command Line Instead
Section titled “Using the Command Line Instead”If you installed the esphome command-line tool, every step above has a direct equivalent. The configuration YAML is
exactly the same.
| Device Builder | Command line |
|---|---|
| Create a configuration (wizard) | esphome wizard livingroom.yaml |
| Validate | esphome config livingroom.yaml |
| Install | esphome run livingroom.yaml |
| Logs | esphome logs livingroom.yaml |
| Clean Build Files | esphome clean livingroom.yaml |
esphome run validates the configuration, reports any problems, then compiles and uploads the firmware. It also
creates a directory named after your device containing the generated PlatformIO project, which you’re free to poke
around in.
The first esphome run needs the device plugged in over USB. After that the upload happens over the air, using the
same command.
The Device Builder is a separate package rather than an esphome subcommand. The pip tab on
Install ESPHome covers installing both, and running the Device Builder against a directory of
configurations.
See Command Line Interface for every esphome subcommand, or
Running ESPHome in Docker if you’re using the container image.
Where To Go Next
Section titled “Where To Go Next”Great! 🎉 You’ve set up your first ESPHome project, installed custom firmware onto a device, and enabled a couple of components through the configuration file.
Now is a good time to browse the Components - there’s a good chance the hardware you want to use is already supported. Be sure to read the FAQ as well. If you hit a problem or want to request a feature, open an issue on the GitHub issue tracker or find us on the Discord chat.