Contributing
We welcome contributions to the ESPHome suite of code and documentation! All of the project code is hosted on GitHub:
ESPHome (Project Source Code)
ESPHome-Docs (The documentation which you’re reading here)
Just clone the repository locally, make changes for your new feature/bug fix and submit a pull request.
Contributing to esphome-docs
Our documentation can always be improved. We rely on contributions from our users to do so. If you notice an issue (for example, spelling/grammar mistakes) or if you want to share your awesome new setup, we encourage you to submit a pull request (PR).
The ESPHome documentation is built using sphinx and uses
reStructuredText for all source (.rst) files.
If you’re not familiar with rST, see Syntax for a quick refresher.
Through GitHub
This guide essentially goes over the same material found in GitHub’s Editing files in another user’s repository. You may also find that page helpful to read.
At the bottom of each page in the docs, there is a “Edit this page on GitHub” link. Click this link and you’ll see something like this:
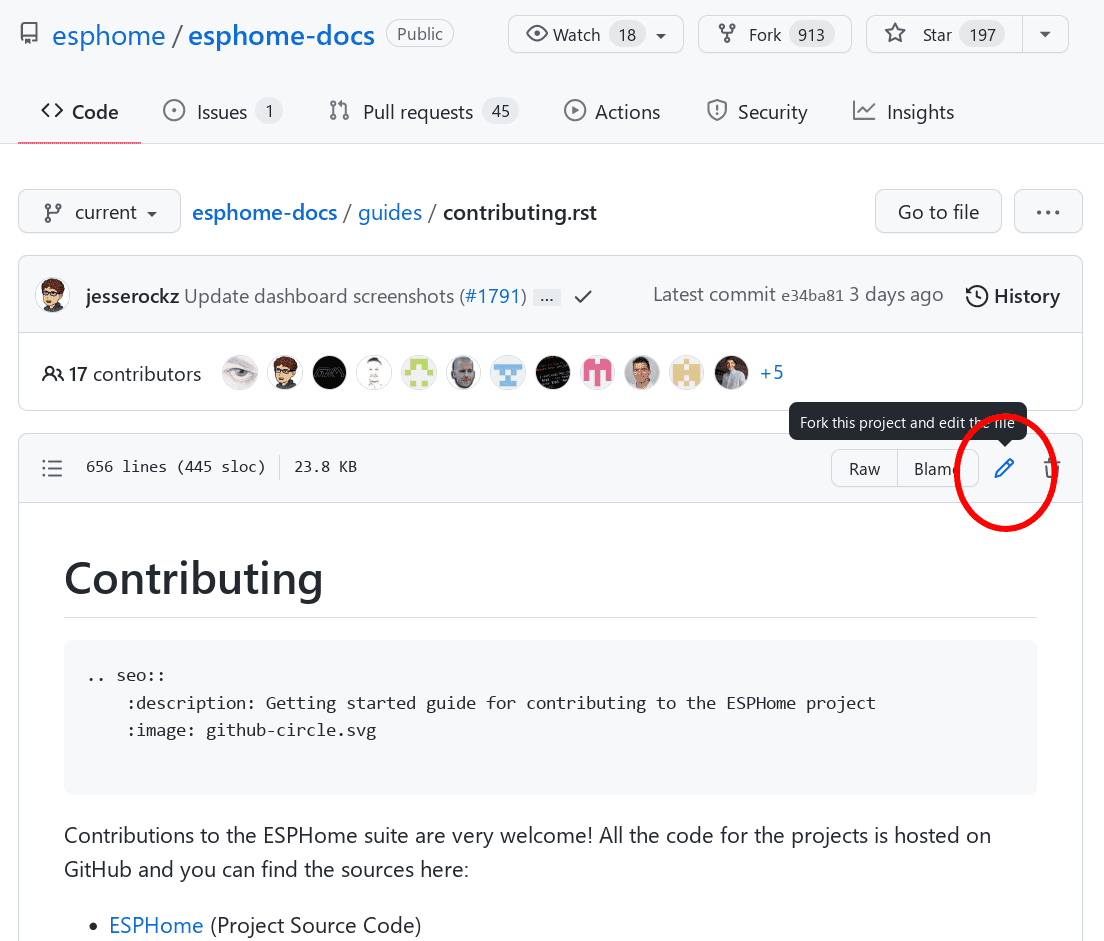
Click the edit button to start making changes. If you’re unsure about syntax, see the quick-start Syntax guide.
Once you’ve made your changes, give them a useful name and press “Propose changes”. At this point, you’ve made the changes on your own personal copy of the docs in GitHub, but you still need to submit them to us.
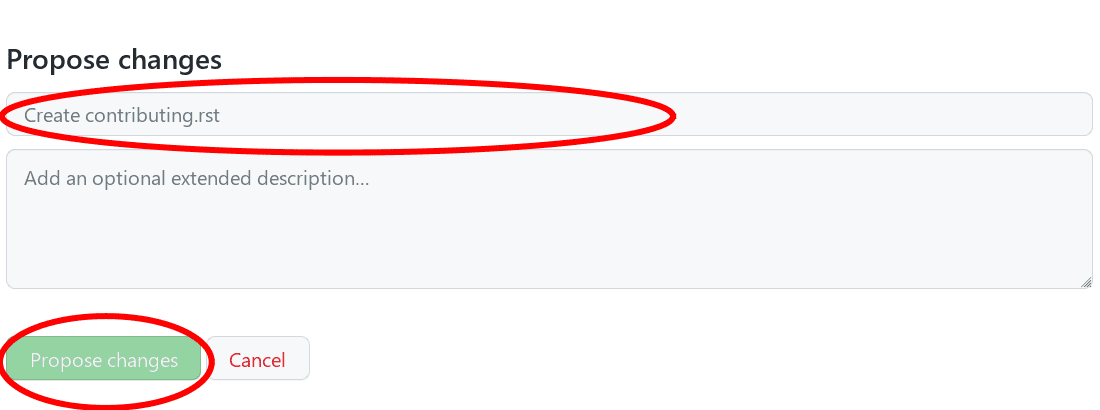
To do that, you need to create a “Pull request” (PR):
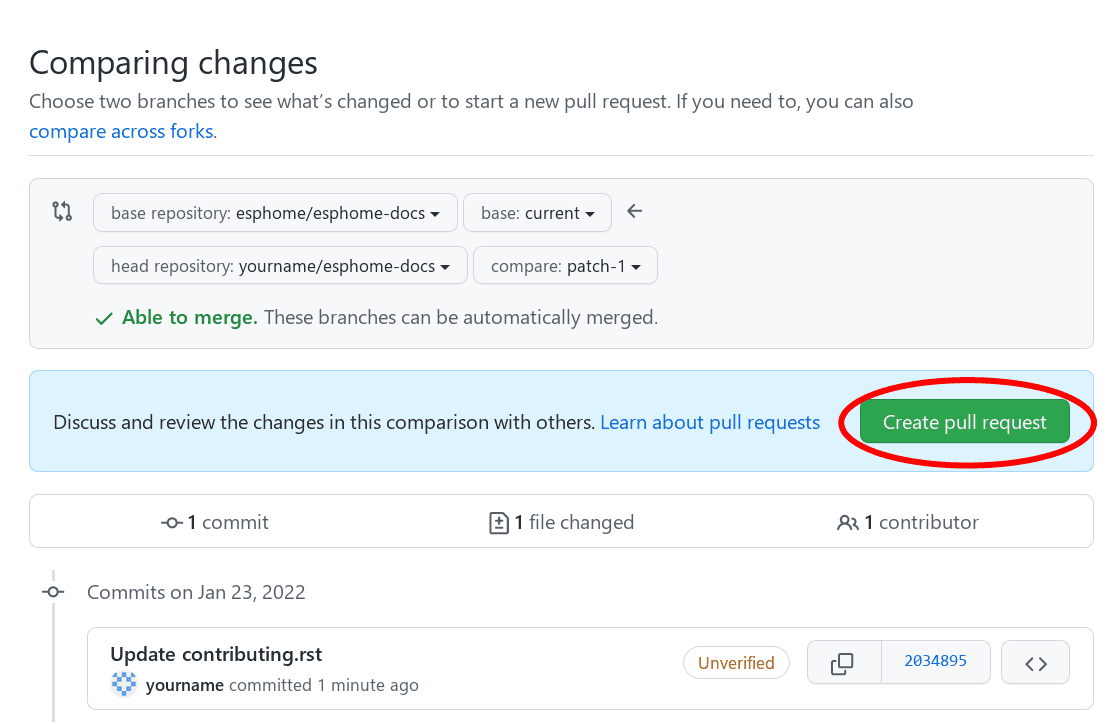
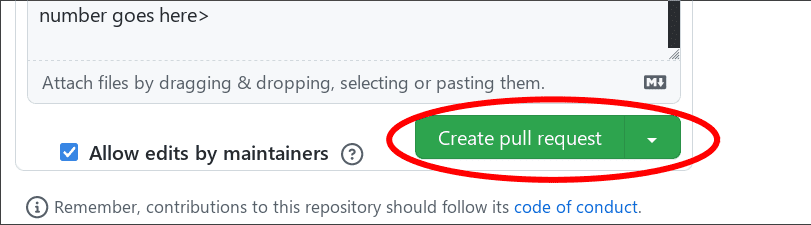
Fill out the new pull request form, replacing the [ ] with [x] to indicate that you have followed the
instructions.
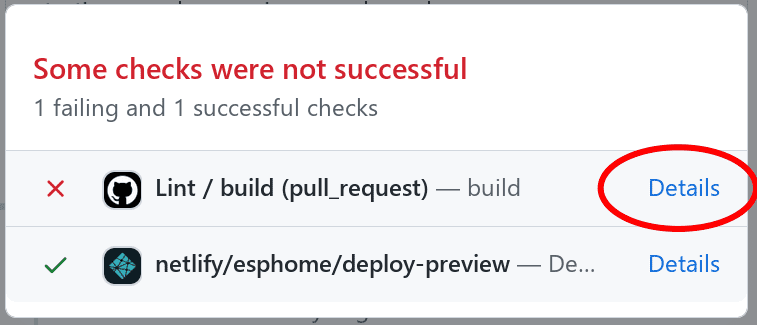
After a few minutes, you’ll see either a green check ✅ or a red ❌ next to your commit in your pull request:

If you see the red ❌, there is at least one error preventing your pull request from being fully processed. Click on the ❌, then click on “Details” next to the lint step to determine what’s wrong with your change(s).
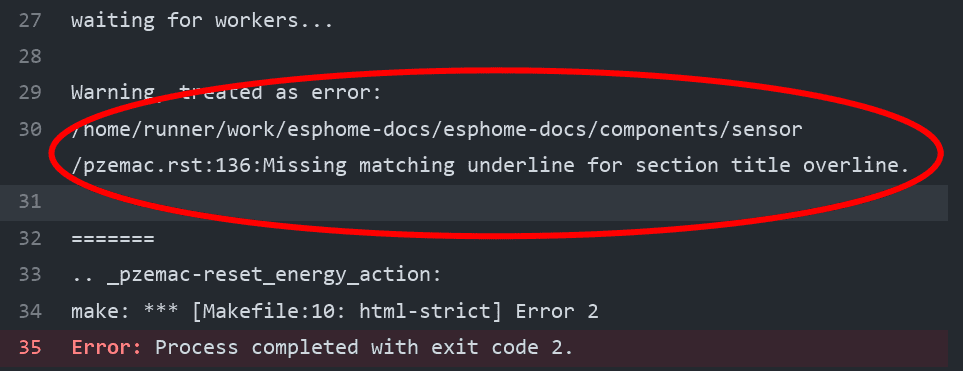
In this example, you need to go to line 136 of pzemac.rst and adjust the number of === so that it completely
underlines the section heading.
Once you make that change, the pull request will be tested & built again; ideally, this time where will be no remaining errors. If, however, more errors are discovered, simply repeat the process above to correct them.
Note
All tests must be passing before we will review (and merge) a pull request.
Build
Note
The easiest way is to use the esphome-docs container image:
docker run --rm -v "${PWD}/":/workspaces/esphome-docs -p 8000:8000 -it ghcr.io/esphome/esphome-docs
…with PWD referring to the root of the esphome-docs git repository. Then, to see the preview, go to
<HOST_IP>:8000 in your browser.
This way, you don’t have to install the dependencies to build the documentation.
To check your documentation changes locally, you first need install Sphinx (with Python 3).
# in ESPHome-Docs repo:
pip install -r requirements.txt
Then, use the provided Makefile to build the changes and start a live-updating web server:
# Start web server on port 8000
make live-html
Notes
Use the English language (duh…)
An image is worth a thousand words, please use them wherever possible. Regardless, don’t forget to optimize them so pages load quickly; you might try using https://tinypng.com/
Try to use examples as often as possible.
When using highly accurate, domain-specific terminology, be sure that it does not interfere with new users understanding the content.
Be sure to target the correct base branch of the
esphome-docsrepository:Fixes/improvements for documentation must target the
currentbranch.New features must target the
nextbranch.
Create new branches in your fork for each pull request; to avoid confusion (and other potential issues), do not make changes directly in the
nextandcurrentbranches in your fork.Wrap lines in all files at no more than 120 characters. This makes reviewing PRs faster and easier. Exceptions should be made only for lines which contain long links or other specific content/metadata that cannot be wrapped.
Syntax
Here’s a quick RST primer:
Title hierarchy is based on order of occurrence, not on type of character used to underline it. For consistency, we adhere to the following order:
Headers:
You can write titles like this:
My Title
========
and section headers like this:
My Section
----------
and sub-section headers like this:
My Sub-section
**************
and sub-sub-section headers like this:
My Sub-sub-section
^^^^^^^^^^^^^^^^^^
Note
The length of the bar below the text must match the title text length.
Section titles should use Title Case.
Links: To create a link to an external resource (for example https://www.google.com), use
\`Link text <link_url>\`__. For example:`Google.com <https://www.google.com>`__
Note
Referral links are only permitted if they provide a direct benefit to the ESPHome project. This policy applies to all official ESPHome documentation and websites.
References: To reference another document, use the
:doc:and:ref:roles (references are set up globally and can be used between documents):.. _my-reference-label: Section to cross-reference -------------------------- See :ref:`my-reference-label`, also see :doc:`/components/switch/gpio`. :doc:`Using custom text </components/switch/gpio>`.
See Supported Microcontrollers, also see GPIO Switch. Using custom text.
Inline code: To have text appear
like this, use double backticks:To have text appear ``like this``, use double backticks.To have text appear
like this, use double backticks.Code blocks: To show a sample configuration file, use the
code-blockdirective:.. code-block:: yaml # Sample configuration entry switch: - platform: gpio name: "Relay #42" pin: GPIOXX
# Sample configuration entry
switch:
  - platform: gpio
    name: "Relay #42"
    pin: GPIOXX
Note
Note that a blank line is required after every
code-blockdirective.Collapsible section: To add a collapsible section, use the
collapsedirective:.. collapse:: Details Something small enough to escape casual notice.
Details
Something small enough to escape casual notice.
.. collapse:: A long code block

    .. code-block:: yaml

        # Sample configuration entry
        switch:
          - platform: gpio
            name: "Relay #42"
            pin: GPIOXX
A long code block
# Sample configuration entry
switch:
  - platform: gpio
    name: "Relay #42"
    pin: GPIOXX
The
:open:flag can be used to have the section open by default... collapse:: Open :open: This section is open by default.
Open
This section is open by default.
Note
The
:open:flag must immediately follow thecollapsedirective without a blank line between them.A blank line is required after every
collapsedirective.
Tabs: To group content into tabs, use the
tabsdirective. The tabs directive defines a tab set. Basic tabs are added using thetabdirective (without s), which takes the tab’s label as an argument:.. tabs:: .. tab:: Apples Apples are green, or sometimes red. .. tab:: Pears Pears are green. .. tab:: Oranges Oranges are orange.
This will appear as
Apples are green, or sometimes red.
Pears are green.
Oranges are orange.
Tabs can also be nested inside one another:
.. tabs::

    .. tab:: Stars

        .. tabs::

            .. tab:: The Sun

                The closest star to us.

            .. tab:: Proxima Centauri

                The second closest star to us.

            .. tab:: Polaris

                The North Star.

    .. tab:: Moons

        .. tabs::

            .. tab:: The Moon

                Orbits the Earth

            .. tab:: Titan

                Orbits Jupiter
The closest star to us.
The second closest star to us.
The North Star.
Orbits the Earth
Orbits Jupiter
Note
A blank line is required after every
tabsdirective.The contents of each tab can be displayed by clicking on the tab that you wish to show. Clicking again on the tab that is currently open will hide its content, leaving only the tab set labels visible.
For advanced features like tab-groupings, refer to https://sphinx-tabs.readthedocs.io/en/latest/
Images: Use the
figuredirective to display an image:.. figure:: images/dashboard_states.png :align: center :width: 40.0% Optional figure caption.
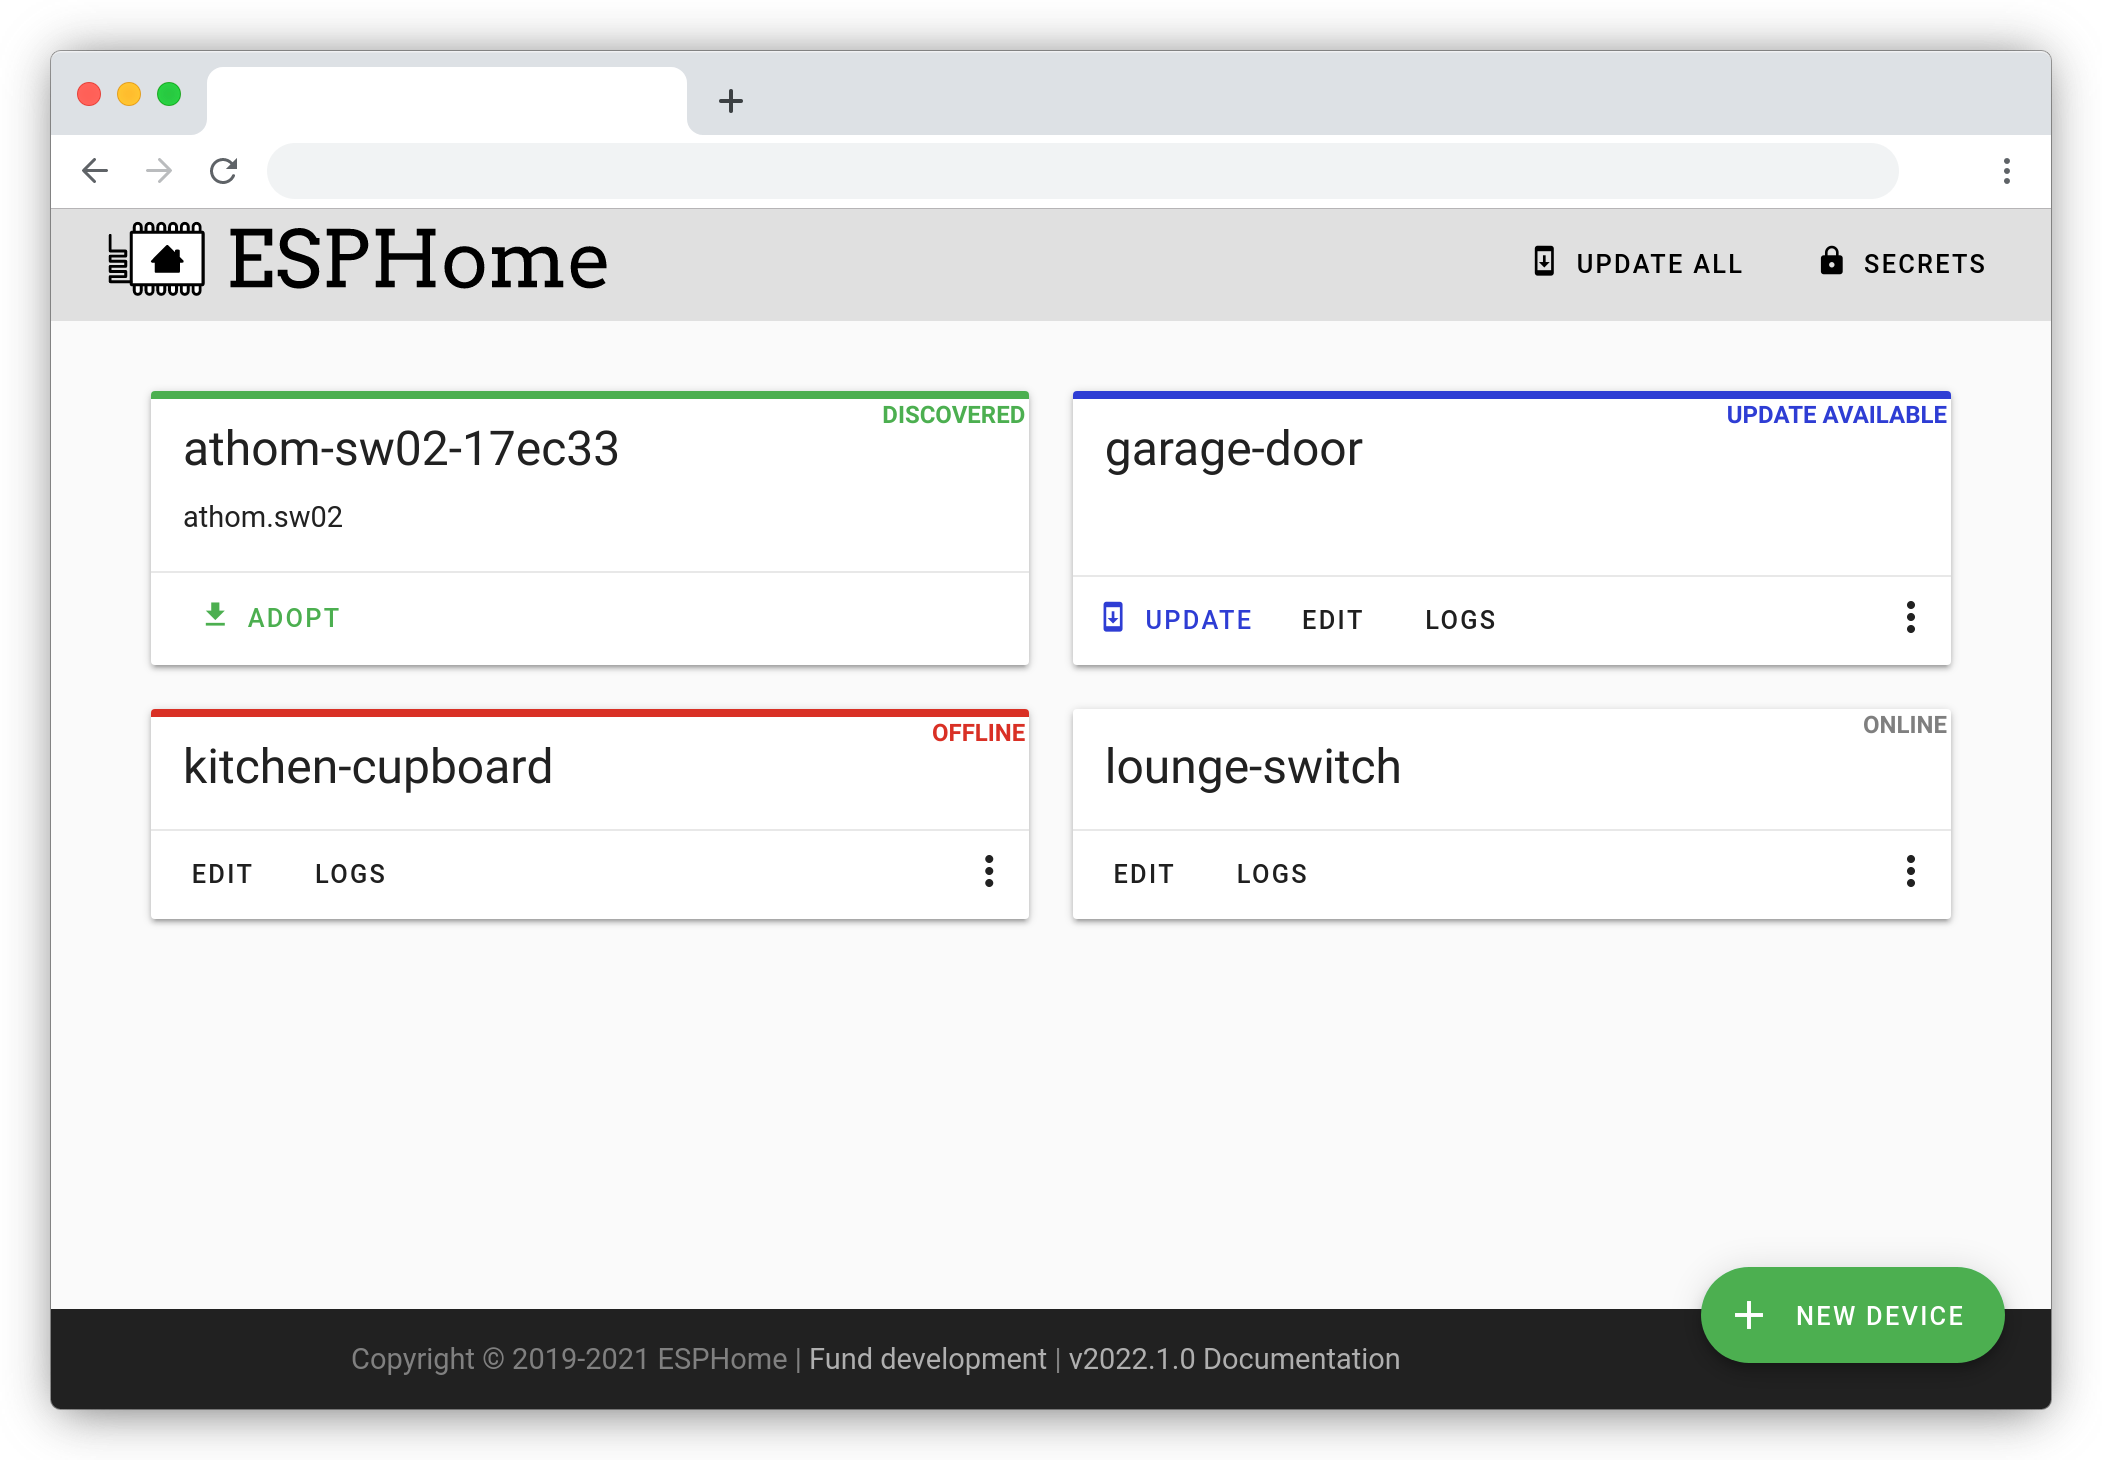
Optional figure caption.
Note
All images in the documentation need to be as small as possible to minimize page load times. Typically, the maximum size should be roughly 1000x800 px or so. Additionally, please use online tools like https://tinypng.com/ or https://tinyjpg.com/ to further compress images.
Notes and warnings: You can create simple notes and warnings using the
noteandwarningdirectives:.. note:: This is a note. .. warning:: This is a warning.
Note
This is a note.
Warning
This is a warning.
Italic and boldface font families: To italicize text, use one asterisk around the text. To put a strong emphasis on a piece of text, put two asterisks around it.
*This is italicized.* (A weird word...)
**This is very important.**
This is italicized. (A weird word…) This is very important.
Ordered and unordered list: The syntax for lists in RST is more or less the same as in Markdown:
- Unordered item

  - Unordered sub-item

- Item with a very long text so that it does not fully fit in a single line and
  must be split up into multiple lines.

1. Ordered item #1
2. Ordered item #2
Unordered item
Unordered sub-item
Item with a very long text so that it does not fully fit in a single line and must be split up into multiple lines.
Ordered item #1
Ordered item #2
imgtable: ESPHome uses a custom RST directive to show the table on the front page (see index.rst). New pages need to be added to the
imgtablelist. The syntax is CSV with <PAGE NAME>, <FILE NAME> (without RST), <IMAGE> (in the top-levelimages/directory), <COMMENT> (optional; short text to describe the component). The aspect ratio of these images should be 8:10 (or 10:8) but exceptions are possible.Because these images are served on the main page, they need to be compressed heavily. SVGs are preferred over JPGs and JPGs should be no more than 300x300px.
If you have imagemagick installed, you can use this command to convert the thumbnail:
convert -sampling-factor 4:2:0 -strip -interlace Plane -quality 80% -resize 300x300 in.jpg out.jpg
reStructured text can do a lot more than this; if you’re looking for a more complete guide, please have a look at the Sphinx reStructuredText Primer.
Setting Up a Development Environment
If you want to develop (a) new feature(s) for ESPHome, you need to set up a development environment.
Note that pip must be installed before running the setup script.
# Clone repos
git clone https://github.com/esphome/esphome.git
git clone https://github.com/esphome/esphome-docs.git

# Install ESPHome
cd esphome/
script/setup
# Start a new feature branch
git checkout -b my-new-feature
cd ..
The environment is now ready for use, but you’ll need to activate the Python virtual environment (venv) each time you wish to use it.
# Activate venv
source venv/bin/activate
Now you can open ESPHome in your IDE of choice (many of us are using VSCode) with the PlatformIO addons (see PlatformIO docs for more info) and develop the new feature with the guidelines below.
Setting Up Git Environment
ESPHome’s codebase is hosted on GitHub; contributing is done exclusively through “Pull Requests” (PRs) in the
GitHub interface. To use this, you need to set up your git environment first.
If you want to contribute changes/fixes you’ve made back to ESPHome, first, go to the repository you want to contribute
to (esphome, for example) and click “fork” in the top right corner. This will create a fork of the repository that
you can modify and create branches on.
# Clone your fork
git clone https://github.com/<YOUR_GITHUB_USERNAME>/<REPO_NAME>.git
# For example: git clone https://github.com/OttoWinter/esphome.git

# To continue you now need to enter the directory you created above
cd <REPO_NAME>
# For example: cd esphome

# Add "upstream" remote
git remote add upstream https://github.com/esphome/<REPO_NAME>.git
# For example: git remote add upstream https://github.com/esphome/esphome.git

# For each patch, create a new branch from latest dev
git checkout dev
git pull upstream dev
git checkout -b <MY_NEW_FEATURE>
# For example: git checkout -b gpio-switch-fix

# Make your modifications, then commit changes with message describing changes
git add .
git commit -m "<COMMIT_MESSAGE>"
# For example: git commit -m "Fix GPIO Switch Not Turning Off Interlocked Switches"

# Upload changes
git push -u origin <BRANCH_NAME>
# For example: git push -u origin gpio-switch-fix
Submitting a Pull Request
After you have pushed your changes to GitHub, go to your repository fork and look for a “create pull request” button near the top of the page (or, alternatively, go to branches and create it from there). As you create the PR:
Complete the Pull Request template:
Include a brief (but complete) summary of your changes.
PRs without a description/summary of the changes will not be reviewed or merged, although exceptions may occasionally be made for small PRs and/or PRs made by frequent contributors/maintainers.
Do not delete the template.
Mark your PR as a draft if it is not ready to be reviewed or merged yet. Your PR should be considered a draft if:
You still plan to make more changes to the code/documentation.
Changes have been requested to the PR but you have not completed making (or discussing) the requested changes yet.
You are waiting on feedback from the community and/or maintainers to complete your changes.
This lets reviewers know that the PR may continue to change so they will not spend valuable time reviewing it until it is ready. We do this because, if a PR is reviewed and then it changes, it must be re-reviewed. Reviewing a single PR multiple times is not a productive use of time and we try as much as possible to avoid doing so.
So now that you’ve created your PR…you’re not quite done! Read on to the next section below so you know what to expect next.
Review Process
Automated Checks
At the bottom of each pull request you will see the “Github Actions” continuous integration (CI) checks which will automatically analyze all code changed in your branch. These checks try to spot (and suggest corrections for) common errors; they look like this:
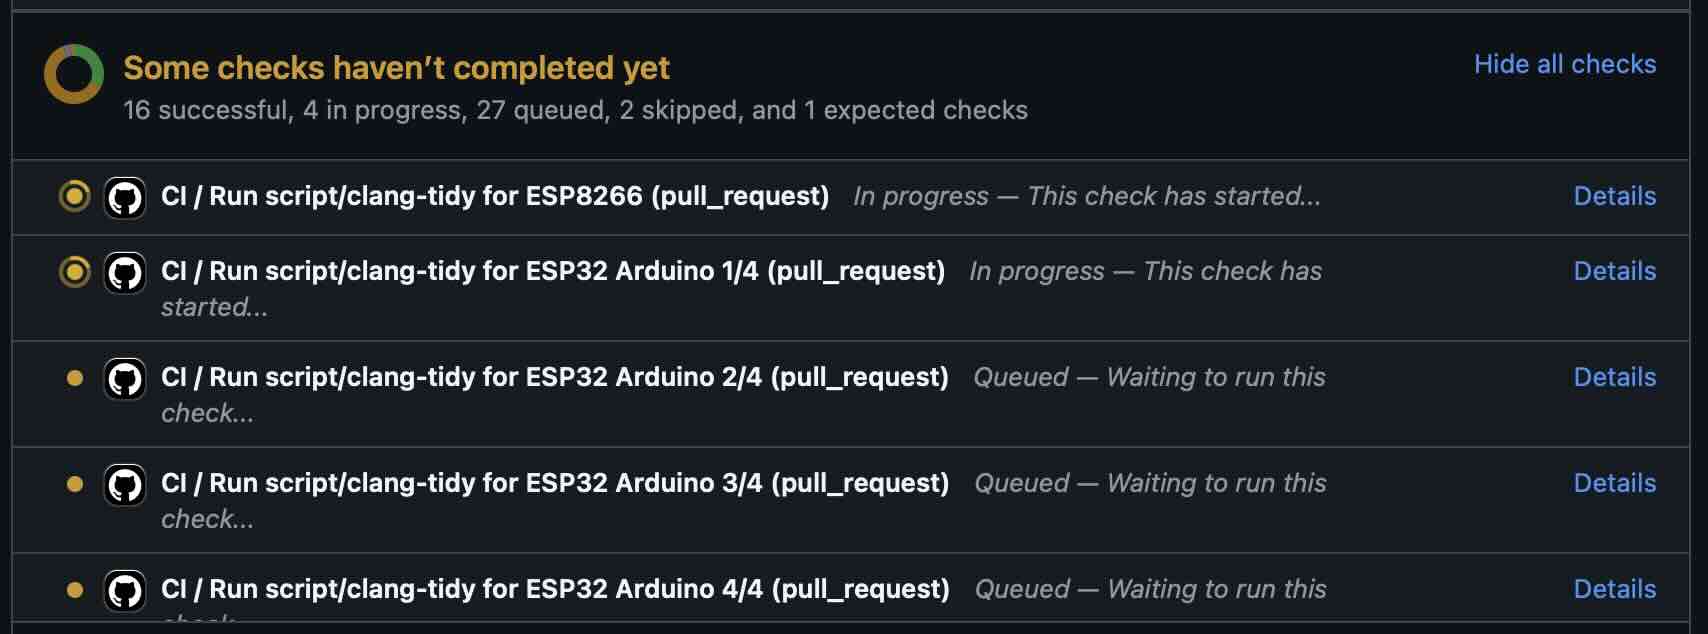
You can click the “Details” link to the right of each check to see the logs for that check. If a red ❌ appears next to any given check, you’ll need to view that check’s logs and make the suggested changes so that the test will pass.
Implementing Feedback from Automated Checks
Occasionally, an automated check may suggest a change that either isn’t directly related to your PR or that may require changes to other components/platforms. When this happens, please create a new/additional PR to implement this change.
For example, the automated checks may suggest moving a constant from your (new) component/platform into const.py.
This is a simple change, but we require that it is done in a separate PR.
Ultimately, all automated checks must be passing before maintainers will review and (eventually) merge your PR!
Review by Maintainers
ESPHome’s maintainers work hard to maintain a high standard for its code, so reviews by a human can take some time.
All automated checks must be passing before maintainers will review and (eventually) merge your PR! See Automated Checks above.
When will my PR be reviewed/merged?
ESPHome is a big project; we encourage everybody to test, review and comment on PRs. Despite this, reviews can (and often do) take some time.
But howwww looonnnggg???
Small PRs are easier to review and are often reviewed first. If you want your PR to be reviewed (and merged) quickly, here are some tips:
Keep PRs as small and as focused as possible. Smaller PRs tend to be easier to understand and take less time to review. Large PRs (many hundreds or thousands of lines) by their nature (of being large) tend to keep changing which means reviewers have to revisit them over and over as they evolve. This isn’t a tenable practice for project maintainers. Break your work into multiple, smaller PRs and link these PRs together with comments in the description so reviewers can follow the work more easily.
The above bullet paraphrased: we would rather review ten ten-line PRs than one 100-line PR.
Be sure to follow all Codebase Standards. When reviewers have to spend time commenting on/correcting your PR because you didn’t name variables correctly or didn’t prefix member variable accesses with
this->, it wastes time we could be using to review other PRs which do follow the standards.If you wish to take on a big project, such as refactoring a substantial section of the codebase or integrating another open source project with ESPHome, please discuss this with us on Discord or create a discussion on GitHub before you do all the work and attempt to submit a massive PR.
If you are not sure about how you should proceed with some changes, please discuss it with us on Discord before you go do a bunch of work that we can’t (for whatever reason) accept…and then you have to go back and re-do it all to get your PR merged. It’s easier to make corrections early-on – and we want to help you!
Can I Help Review PRs?
YES! PLEASE!!!
While only maintainers can merge PRs, we value feedback from the community and it is considered as we review them. Put another way, when a PR has several “This worked for me!” comments on it, we know that the author’s work is doing what it’s supposed to, even if some other, underlying aspects might still need some fine-tuning to be consistent with the rest of the codebase.
Testing
Often, the easiest way to help review PRs is by testing. Many (but not all) PRs can be used as External Components and can easily be added into your configuration for testing, like this:
external_components:
  - source: github://pr#2639
    components: [ rtttl ]
…you just need to update the PR number and component name(s) in the YAML accordingly.
If you test a PR, please share your results by leaving a comment on the PR! If it doesn’t work, be sure to include any messages from the compiler and/or device logs so the author can troubleshoot the issue. Comments which state no more than “it doesn’t work” are not helpful!
Code Review
Beyond basic functionality (“does it work?”), here are a few other items we check for when reviewing PRs:
Are file names & paths appropriate for/consistent with the codebase?
Are namespace names consistent with the component/platform?
Do all
#definemacro names match the namespace?Are all Codebase Standards adhered to?
Are there any calls to
delay()with a duration longer than 10 milliseconds?Are any class methods doing work that they shouldn’t be? For example, let’s consider the
dump_config()method:This method is intended to do nothing other than print values that were retrieved earlier (in
setup()).If this method has (for example) a
this->read(...)call in it, it does not pass review and needs to be changed.
Is the component/platform doing exactly what it’s supposed to? Consider the example of a new serial bus interface a contributor has implemented:
The author has implemented this component with an action called
superbus.send.The author has concerns about too much traffic on the bus, so they have implemented a check in this action which blocks duplicate message transmissions on the bus. The effect is that, if
superbus.sendis called repeatedly with the same message, only the first call will actually send the message on the bus.
This behavior is not consistent with what ESPHome users expect. If the action
superbus.sendis called, it should always send the message, regardless of the content. If there are concerns about (in this example) bus utilization, perhaps messages can be queued instead of dropped/ignored.
Why was my PR marked as a draft?
If your PR was reviewed and changes were requested, our bot will automatically mark your PR as a draft. This means that the PR is not ready to be merged or further reviewed for the moment.
When a PR is marked as a draft, it tells other reviewers that this particular PR is a work-in-progress and it doesn’t require their attention yet.
Once you have made the requested changes, you can mark the PR as ready for review again by clicking the “Ready for review” button:
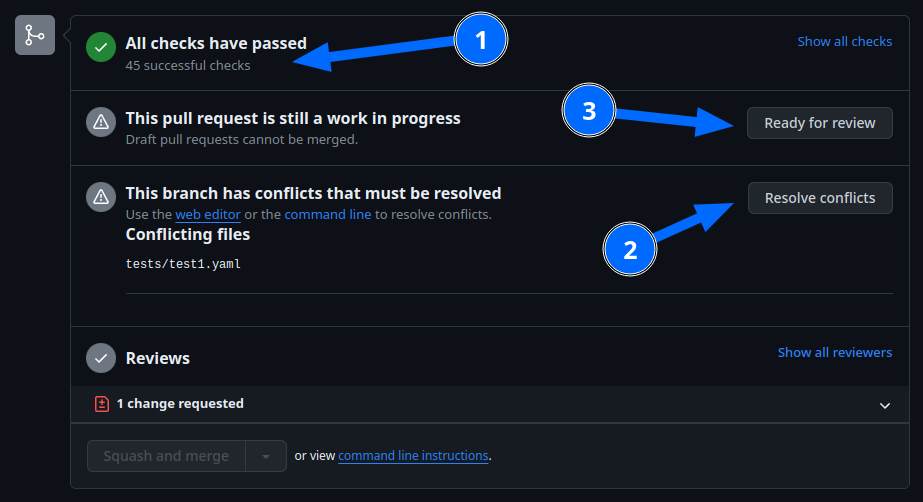
Before you click the “Ready for review” button, ensure that:
You have addressed all requested changes
There are no merge conflicts
All CI jobs and checks are passing successfully
Once you’ve clicked the “Ready for review” button, the PR will return to a normal state again and our bot will automatically notify the reviewers who requested the changes that the PR is ready to go!
Updating Your Branches
Sometimes you’ll want (or need) to bring changes that were made in ESPHome’s dev branch back into your (local copy
of a) branch.
The examples that follow in this section assume that you have:
already used
git remoteto addupstreamas shown earlier, andyour feature branch (the branch from which you created your PR) currently checked out
Feature Branches
There are a couple of ways you can update your (local) feature branch. The easiest is by clicking the “Update branch” button in GitHub:

…then run git pull to pull these changes back down from GitHub.
If you prefer to do it the command-line/terminal way, you can do this, instead:
# Fetch the latest upstream changes
git fetch upstream dev
# Merge in the changes we fetched above
git merge upstream/dev
Your Local Copy of dev
As you create new branches for your work, you’ll want to be sure they include all of the latest changes from ESPHome’s
dev branch – it’s not a good practice to create a new feature branch from an outdated dev branch.
For this reason, you’ll periodically want to update your local dev branch. A more detailed explanation can be found
here, but here’s the TL;DR:
# Fetch the latest upstream changes
git fetch upstream dev
git rebase upstream/dev
Note that you can use this procedure for other branches, too, such as next or current from esphome-docs.
Warning
Using git rebase will result in your changes having to be force-pushed back up to GitHub.
Do not force-push your branch once your PR is being reviewed; GitHub allows reviewers to mark files as “viewed” and, when you force-push, this history is lost, forcing your reviewer to re-review files they may have already reviewed!
If you must update your branch, use a method described in Feature Branches, instead.
Contributing to ESPHome
This is a guide to contributing to the ESPHome codebase. ESPHome uses two languages for its project: Python and C++.
The Python side of ESPHome reads a YAML configuration file, validates it and transforms it into a custom firmware which includes only the code needed to perform as defined in the configuration file.
The C++ part of the codebase is what’s actually running on the microcontroller; this is called the “runtime”. This part
of the codebase should first set up the communication interface to a sensor/component/etc. and then communicate with
the ESPHome core via the defined interfaces (like Sensor, BinarySensor and Switch, among others).
Directory Structure
After you’ve set up a development environment, you will have a directory structure like this:
esphome
├── __main__.py
├── automation.py
├── codegen.py
├── config_validation.py
├── components
│   ├── __init__.py
│   ├── dht12
│   │   ├── __init__.py
│   │   ├── dht12.cpp
│   │   ├── dht12.h
│   │   ├── sensor.py
│   ├── restart
│   │   ├── __init__.py
│   │   ├── restart_switch.cpp
│   │   ├── restart_switch.h
│   │   ├── switch.py
│  ...
├── tests
│   ├── components
│   │   ├── dht12
│   │   │   ├── common.yaml
│   │   │   ├── test.esp32-ard.yaml
│   │   │   ├── test.esp32-c3-ard.yaml
│   │   │   ├── test.esp32-c3-idf.yaml
│   │   │   ├── test.esp32-idf.yaml
│   │   │   ├── test.esp8266-ard.yaml
│   │   │   ├── test.rp2040-ard.yaml
│  ...
All components are in the “components” directory. Each component is in its own subdirectory which contains the Python
code (.py) and the C++ code (.h and .cpp).
In the “tests” directory, a second “components” directory contains configuration files (.yaml) used to perform test
builds of each component. It’s structured similarly to the “components” directory mentioned above, with subdirectories
for each component.
Consider a YAML configuration file containing the following:
hello1:

sensor:
  - platform: hello2
In both cases, ESPHome will automatically look for corresponding entries in the “components” directory and find the
directory with the given name. In this example, the first entry causes ESPHome to look for the
esphome/components/hello1/__init__.py file and the second entry tells ESPHome to look for
esphome/components/hello2/sensor.py or esphome/components/hello2/sensor/__init__.py.
Let’s leave what’s written in those files for the next section, but for now you should also know that, whenever a component is loaded, all the C++ source files in the directory of the component are automatically copied into the generated PlatformIO project. All you need to do is add the C++ source files in the component’s directory and the ESPHome core will copy them with no additional code required by the component developer.
Note
For testing, you can use External Components.
Config Validation
The first task ESPHome performs is to read and validate the provided YAML configuration file. ESPHome has a powerful “config validation” mechanism for this purpose. Each component defines a config schema which is used to validate the provided configuration file.
To do this, all ESPHome Python modules that can be configured by the user define a special variable named
CONFIG_SCHEMA. An example of such a schema is shown below:
import esphome.config_validation as cv

CONF_MY_REQUIRED_KEY = 'my_required_key'
CONF_MY_OPTIONAL_KEY = 'my_optional_key'

CONFIG_SCHEMA = cv.Schema({
  cv.Required(CONF_MY_REQUIRED_KEY): cv.string,
  cv.Optional(CONF_MY_OPTIONAL_KEY, default=10): cv.int_,
}).extend(cv.COMPONENT_SCHEMA)
This variable is automatically loaded by the ESPHome core and is used to validate the provided configuration. The underlying system ESPHome uses for this is voluptuous. How validation works is out of scope for this guide; the easiest way to learn is to look at how similar components validate user input.
A few notes on validation:
ESPHome puts a lot of effort into strict validation. All validation methods should be as strict as possible and detect incorrect user input at the validation stage, mitigating compiler warnings and/or errors.
All default values should be defined in the schema – not in C++ codebase.
Prefer naming configuration keys in a way which is descriptive instead of short. Put another way, if the meaning of a key is not immediately obvious, don’t be afraid to use
long_but_descriptive_keys. There is no reason to use obscure shorthand. As an example,scrn_btn_inptis indeed shorter but more difficult to understand, particularly for new users; avoid naming keys and variables in this way.
Code Generation
The last step the Python codebase performs is called code generation. This runs only after the user input has been successfully validated.
As you may know, ESPHome “converts” the user’s YAML configuration into C++ code (you can see the generated code under
<NODE_NAME>/src/main.cpp). Each component must define its own to_code method that “converts” the user input to
C++ code.
This method is also automatically loaded and invoked by the ESPHome core. Here’s an example of such a method:
import esphome.codegen as cg

async def to_code(config):
    var = cg.new_Pvariable(config[CONF_ID])
    await cg.register_component(var, config)

    cg.add(var.set_my_required_key(config[CONF_MY_REQUIRED_KEY]))
The details of ESPHome code generation is out-of-scope for this document. However, ESPHome’s code generation is 99% syntactic sugar - and (again) it’s probably best to study similar components and just copy what they do.
There’s one important concept for the to_code method: coroutines with await.
The problem that necessitates coroutines is this: in ESPHome, components can declare (via cg.Pvariable) and access
variables (cg.get_variable()) – but sometimes, when one part of the codebase requests a variable, it has not been
declared yet because the code for the component creating the variable has not yet run.
To allow for ID references, ESPHome uses so-called coroutines. When you see an await statement in a to_code
method, ESPHome will call the provided method and, if that method needs to wait for a variable to be declared first,
await will wait until that variable has been declared. After that, await returns and the method will execute on
the next line.
Next, there’s a special method - cg.add - that you will often use. cg.add() performs a very simple task: Any
C++ declared in the parentheses of cg.add() will be added to the generated code. Note that, if you do not call
“add” to insert a piece of code explicitly, it will not be added to the main.cpp file!
Runtime
At this point, the Python part of the codebase has completed its work. Let’s move on and discuss the C++ part of components.
Most components consist of two primary parts/steps:
Setup Phase
Run Phase
When you create a new component, your new component will inherit from Component.
That class has a special setup() method that will be called once to set up the component -
at the time the setup() method is called, all the setters generated by the Python codebase
have already run and the all fields are set for your class.
The setup() method should set up the communication interface for the component and check
if communication works (if not, it should call mark_failed()).
Again, look at examples of other components to learn more.
The next method that will be called with your component is loop() (or update() for a
PollingComponent). These methods should retrieve the latest data from your component and publish them with
the provided methods.
Finally, your component must have a dump_config method that prints the complete user configuration.
Test Configurations
Each (new) component/platform must have tests. This enables our CI system to perform a test build of the component/platform to ensure it compiles without any errors. The test file(s) should incorporate the new component/platform itself as well as all automations it implements.
Overview
The tests aim to test compilation of the code for each processor architecture:
Xtensa (ESP8266, original ESP32 and S-series)
RISC-V (ESP32 C-series)
ARM (RP2040)
…and for each supported framework:
Arduino
There should be at least one test for each framework/architecture combination. We can probably go without saying it, but some framework/architecture combinations are simply not supported/possible, so tests for those are impossible and, as such, are (naturally) omitted.
General Structure
We try to structure the tests in a way so as to minimize repetition. Let’s look at the dht12 sensor platform as an
example:
First, you’ll find a common.yaml file which contains this:
i2c:
  - id: i2c_dht12
    scl: ${scl_pin}
    sda: ${sda_pin}

sensor:
  - platform: dht12
    temperature:
      name: DHT12 Temperature
    humidity:
      name: DHT12 Humidity
    update_interval: 15s
It’s a shared configuration file that defines common settings used across all hardware platforms. Having a “common” file like this minimizes duplication and ensures test consistency across all platforms.
To use common.yaml in a test configuration, YAML substitutions and the insertion operator are used (see
Substitutions). This allows the test YAML file to reference and include the shared configuration.
For the dht12 platform, one of the test files is named test.esp32-ard.yaml and it contains this:
substitutions:
  scl_pin: GPIO16
  sda_pin: GPIO17

<<: !include common.yaml
By including common.yaml, all test configurations maintain the same structure while allowing flexibility for
platform-specific substitutions such as pin assignments. This approach simplifies managing multiple test cases across
different hardware platforms.
Which Tests Do I Need?
We require a test for each framework/architecture combination the component/platform supports. Most components/platforms include the following test files:
test.esp32-ard.yaml- ESP32 (Xtensa)/Arduinotest.esp32-idf.yaml- ESP32 (Xtensa)/IDFtest.esp32-c3-ard.yaml- ESP32-C3 (RISC-V)/Arduinotest.esp32-c3-idf.yaml- ESP32-C3 (RISC-V)/IDFtest.esp8266-ard.yaml- ESP8266 (Xtensa)/Arduinotest.rp2040-ard.yaml- RP2040 (ARM)/Arduino
In cases where the component/platform implements support for some microcontroller-specific hardware component, tests should be added to/omitted from the list above as appropriate. The Analog To Digital Sensor is one example of this.
Running the Tests
You can run the tests locally simply by invoking the test script:
script/test_build_components -e compile -c dht12
Our CI will also run this script when you create or update your pull request (PR).
A Note About Delays in Code
Code in loop(), update() and setup() must not block.
Methods like delay() should be avoided and delays longer than 10 ms are not permitted. Because ESPHome uses a
single-threaded loop for all components, if your component blocks, it will delay the whole loop, negatively impacting
other components. This can result in a variety of problems such as network connections being lost.
If your code must wait for something to happen (for example, your sensor requires hundreds of milliseconds to
initialize and/or take a reading), then you’ll need to implement a state machine to facilitate this. For example, your
code can send the “take reading” command, return, and, when the next iteration of loop() or update() is called,
it then attempts to read back the measurement from the sensor.
loop() is called every 16 ms (assuming no other components delay this, which may happen from time to time) and
update() is called at an interval defined in the user configuration for the component, but only for
PollingComponent.
For any Component (which is nearly everything), the well-known set_timeout method is also available;
this can be a handy alternative to implementing a state machine.
A Note About Custom Components
“I read that support for custom components was removed…so now what do I do???”
ESPHome’s “custom component” mechanism was a holdover from Home Assistant’s feature by the same name. It existed before External Components and offered a way to “hack in” support for devices which were not officially supported by ESPHome.
Why were Custom Components Removed?
There are several reasons for this change.
Custom components are very fragile:
There is no validation. You can easily configure a custom component incorrectly and there will be no warning.
Types are not checked. You might incorrectly pass a variable of an incorrect type or unit to a custom component resulting in compiler errors, unexpected behavior and/or crashes.
Custom components are difficult to use. You have to manually copy all of the custom component’s files into just the right location on your system or else you will receive compiler errors and the component won’t work.
Custom components lack flexibility and almost always require C++ code changes when you want them to work even slightly differently than the original author intended/designed. For example, a simple change of input units (
cmtom, for example) could require significant changes to the C++ code, depending on how the original author designed the custom component.
External Components initially require a bit more effort by the developer but are ultimately more robust and are easier to use and share:
Just like any other ESPHome component/platform:
They are configured entirely in YAML.
Their YAML configuration is validated.
They do not require the user to:
Manually copy files onto their system.
Touch/edit any C++ code.
They tend to be more flexible since they are configured in YAML (as opposed to editing C++ code to make changes).
What’s the Difference?
Custom components are typically (more or less) just the Runtime part of an ESPHome component/platform. On the other hand, External Components are just like any other ESPHome component – the only difference is that they are external in the sense that they are not “officially” a part of ESPHome.
In terms of implementation, custom components just lack the Python part of an ESPHome component, specifically:
As such, most custom components can be made into External Components simply by adding the required Python parts to make the custom component into a proper, complete ESPHome component.
What’s Next?
We encourage all custom component developers to extend their custom component(s) into proper External Components; doing so will make your custom component easier to share and use. As you do so, be sure to have a look at the the Contributing to ESPHome section above as it walks through ESPHome (component) architecture. In addition, it’s often helpful to take a look at other, similar components and adapt them to fit the needs of your custom component. For common hardware devices such as sensors, this is often a reasonably trivial exercise and we are happy to help you along!
Extras
Note
This serves as documentation for some of ESPHome’s internals and is not necessarily part of the development guide.
All Python modules have some magic symbols that will automatically be loaded by the ESPHome loader. These are:
CONFIG_SCHEMA: The configuration schema to validate the user config against.to_code: The function that will be called with the validated configuration and should create the necessary C++ source code.DEPENDENCIES: Mark the component to depend on other components. If the user hasn’t explicitly added these components in their configuration, a validation error will be generated.AUTO_LOAD: Automatically load a component if the user hasn’t added it manually.MULTI_CONF: Mark this component to accept an array of configurations. If this is an integer instead of a boolean, validation will only permit the given number of entries.CONFLICTS_WITH: Mark a list of components as conflicting with this component. If the user has one of them in their config, a validation error will be generated.CODEOWNERS: GitHub usernames or team names of people that are responsible for this component. You should add at least your GitHub username here, as well as anyone who helped you to write code that is being included.
Codebase Standards
ESPHome’s maintainers work hard to maintain a high standard for its code. We try our best to adhere to these standards:
The C++ code style is based on the Google C++ Style Guide with a few modifications.
Function, method and variable names are
lower_snake_caseClass/struct/enum names should be
UpperCamelCaseConstants should be
UPPER_SNAKE_CASEFields should be
protectedandlower_snake_case_with_trailing_underscore_(DO NOT useprivate)It’s preferred to use long variable/function names over short and non-descriptive ones.
All uses of class members and member functions should be prefixed with
this->to distinguish them from global functions/variables.Use two spaces, not tabs.
Using
#defineis discouraged and should be replaced with constants or enums (if appropriate).Use
using type_t = int;instead oftypedef int type_t;Wrap lines in all files at no more than 120 characters. This makes reviewing PRs faster and easier. Exceptions should be made only for lines where wrapping them would result in a syntax issue.
Components should dump their configuration using
ESP_LOGCONFIGat startup indump_config().ESPHome uses a unified formatting tool for all source files (but this tool can be difficult to install). When creating a new PR in GitHub, be sure to check the Github Actions output to see what formatting needs to be changed and what potential problems are detected.
Use of external libraries should be kept to a minimum:
If the component you’re developing has a simple communication interface, please consider implementing the library natively in ESPHome.
Libraries which directly manipulate pins or don’t do any I/O generally do not cause problems.
Libraries which use hardware interfaces (I²C, for example), should be configured/wrapped to use ESPHome’s own communication abstractions.
If the library accesses a global variable/state (
Wireis a good example) then there’s likely a problem because the component may not be modular. Put another way, this approach may mean that it’s not possible to create multiple instances of the component for use within ESPHome.
Components must use the provided abstractions like
sensor,switch, etc. Components specifically should not directly access other components – for example, to publish to MQTT topics.Implementations for new devices should contain reference links for the data sheet and other sample implementations.
If you have used
delay()or constructed code which blocks for a duration longer than ten milliseconds, be sure to read A Note About Delays in Code.Do not use
sstream/stringstreamto format variables into strings. This library bloats the compiled binary by over 200 kilobytes (KBs) which causes problems for devices with small amounts (1-4 MB) of flash memory.Comments in code should be used as appropriate, such as to help explain some complexity or to provide a brief summary of what a class, method, etc. is doing. PRs which include large blocks of commented-out code will not be accepted. Single lines of commented code may be useful from time to time (for example, to call out something which was deliberately omitted for some reason) but should generally be avoided.
Please test your changes :)
Note
You can also run the lint and Github Actions checks through a docker image:
# Full lint+test suite
docker run --rm -v "${PWD}/":/esphome -it ghcr.io/esphome/esphome-lint script/fulltest

# Run lint only over changed files
docker run --rm -v "${PWD}/":/esphome -it ghcr.io/esphome/esphome-lint script/quicklint
If you are using Windows and have docker installed the syntax is slightly different.
If you have cloned esphome to c:\edev\esphome the volume format is c/edev/esphome
# convert the volume format
$current_dir=(Get-Location).Path.ToLower().Replace(':','').Replace('\','/')
# Run lint only over changed files from powershell
docker run --rm -v "$($current_dir):/esphome" -it ghcr.io/esphome/esphome-lint script/quicklint