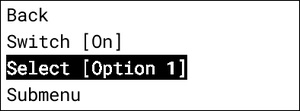
Graphical Display Menu
The component provides an infrastructure for setting up a hierarchical menu
on graphical displays. This offers the user an interactive method to display
labels, control entities like switch, select, number available locally on the
ESPHome node, without the requirement of a network connection.

Overview
The component implements the Display Menu component providing a hierarchical menu primarily intended to be controlled either by a rotary encoder with a button or a five-button joystick controller.
The component needs to be connected to an instance of a display supporting ESPHome’s rendering engine such as E-Paper displays or OLED displays.
# Example configuration entry
graphical_display_menu:
  id: my_graphical_display_menu
  display: my_display_component
  on_redraw:
    then:
      component.update: my_display_component
  active: false
  mode: rotary
  items:
    ...
Configuration variables:
id (Optional, ID): Manually specify the ID used for code generation.
display (Optional, ID): ID of the display to render to. See Drawing Modes for more details
font (Required, Font): Specifies the font to use
foreground_color (Optional, Color): Specifies the foreground color to use. Defaults to COLOR_ON
background_color (Optional, Color): Specifies the background color to use. Defaults to COLOR_OFF
Automations:
- on_redraw (Optional, Automation): An automation to perform
when the menu needs to be redrawn. This can be useful if your display has slow refresh rates.
For example E-Ink displays that are used with
display_interval: never.
Additional configuration is described in the Display Menu component.
Drawing Modes
Pop Up Mode
When a display is specified the menu will create a page as part of the initialisation. It will render to the entire of the display when invoked. This is useful when you may want to use the display for other purposes but show a menu in response to user interaction.
ℹ️ Note
Pop Up Mode requires that your display makes use of pages. If you are using a drawing lambda, without pages, it will not behave as expected. Instead you will have to use Advanced Mode
Advanced Drawing Mode
If you do not specify a display when setting up a menu you will be responsible for controlling drawing of the menu. This also allows you to render the menu to a smaller portion than the available screen size. It May be useful in situations where you want to display a menu as part of a larger user interface (for example rendering a sensor graph and a control menu next to it)
# Example configuration entry
graphical_display_menu:
  - id: my_menu
    # Note: No display specified
    active: true

display:
  - platform: waveshare_epaper
    id: my_display_component
    pages:
    - id: advanced_drawing_mode_page
      lambda: |-
        const auto display_width = it.get_width();
        const auto display_height = it.get_height();
        auto half_display_width = (int)(display_width / 2.0f);

        // This will render the menu to the right half of the screen leaving the left half for other drawing purposes
        // Arguments: it.menu(x, y, menu, width, height);
        it.menu(half_display_width, 0, id(my_menu), half_display_width, display_height);
Emulating Pop Up Mode
If you wish to emulate Pop Up Mode the following sample will emulate the same behaviour. This can be useful if you’re using a display without pages or if you have other requirements that requires control over how and where the menu is rendered.
graphical_display_menu:
  id: my_menu
  items:
    # ... other items here ...

    # An exit menu item (or some other mechanism) that calls display_menu.hide
    - type: command
      on_value:
        then:
          - display_menu.hide: my_menu

display:
  - platform: ..
    lambda: |-
      const auto width = it.get_width();
      const auto height = it.get_height();

      if (id(my_menu).is_active()) {
        it.menu(0, 0, id(my_menu), width, height);
      } else {
        it.print(0, 0, id(font), "Menu is hidden, other drawing would go here here");
      }
Controlling Menu Item Rendering
By default menu items with a value will be rendered between a set of parenthesis. This can be
controlled via the menu_item_value parameter.
- menu_item_value (Optional, Templates): Specifies how to render values for
menu items that have values (eg. Selects, numbers). Defaults to rendering the value as
“(value here)”. Receives a MenuItemValueArguments as the argument
it.
graphical_display_menu:
  menu_item_value: !lambda |-
    // Will render your menu item value as "My menu label ~my value here~"" normally and "My menu label *my value here*" when in edit mode
    std::string label = " ";
    if (it->is_item_selected && it->is_menu_editing) {
      label.append("*");
      label.append(it->item->get_value_text());
      label.append("*");
    } else {
      label.append("~");
      label.append(it->item->get_value_text());
      label.append("~");
    }
    return label;
ℹ️ Note
Ensure that all characters you use in the menu_item_value are available glyphs for your font
User Interaction Example
The below example is a more complete example showing how you might use a rotary encoder and button to display/hide the menu and move through the available options
# Example configuration entry
display:
  - platform: waveshare_epaper
    id: my_display_component
    pages:
    - id: graph_page
      lambda: |-
        it.print(0, 0, id(my_font), "My menu is not currently active");

font:
  - file: ...
    id: my_font
    size: 16

graphical_display_menu:
  id: my_graphical_display_menu
  display: my_display_component
  on_redraw:
    then:
      component.update: my_display_component
  active: false
  mode: rotary
  items:
    - type: Label
      text: Menu Item 1
    - type: Label
      text: Menu Item 2

# Rotary encoder to provide navigation
sensor:
  - platform: rotary_encoder
    ...
    filters:
      debounce: 30ms
    on_anticlockwise:
      - display_menu.up: my_graphical_display_menu
    on_clockwise:
      - display_menu.down: my_graphical_display_menu

# A debounced GPIO push button is used to 'click'
binary_sensor:
  - platform: gpio
    ...
    filters:
      - delayed_on: 30ms
      - delayed_off: 30ms
    on_press:
  - if:
      condition:
        display_menu.is_active: my_graphical_display_menu
      then:
        - display_menu.enter: my_graphical_display_menu
      else:
        - display_menu.show:  my_graphical_display_menu
